


How to install string lights in backyard?
1. We utilized the large pine tree that sits right along our fence line as the support for one side of the lights. After drilling a small hole, Jack screwed a stainless steel eye hook into the tree.

2. Even though Jack was sure there would be a wood header above the windows along the back of the house he double checked with a stud finder on the inside. When drilling for the eye hook on the house you can see wood shavings came out indicating he was indeed drilling into wood.

3. Jack measured how much of the cable we needed and then we cut off the excess with the bolt cutters. We chose to use galvanized steel rope to bare the load of the string lights. This should extend the life of the string lights drastically because the cable won’t stretch or break.

4. It is also easier to attach the steel cable to an eye hook than attaching the string lights to an anchor would be. To attach the cable to the eye hook we threaded the cable through a ferrule.
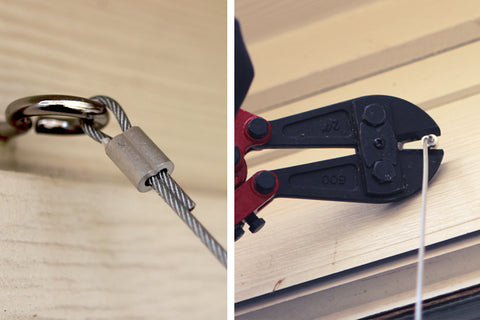
5. Once the wire was in place we took bolt cutters and crimped the ferrule to make the wire secure.

6. Next, we attached to the string lights to the cable. Jack zip tied the cable and string lights together and I followed behind him and screwed in the light bulbs.

7. After we got all the lights zip tied and bulbs screwed in, Jack attached the other side of the cable to the eye hook suspending the string lights at the correct height.

8. We initially planned to have five runs of string lights from the house to the tree but realized after completing two entire runs that the odd number of runs would leave one of the two plugs at the tree instead of the house.
That was a “Doh!” moment for us. Both strings needed to plug in at the house and we recognized that wasn’t going to happen the way we were doing it so panic set in until we calmed down and had to rethink our game plan.
The solution turned out not to be too difficult. We removed one of the eye hooks and relocated the two inner eye hooks so they were spaced evenly, giving us four runs instead of five.
The one challenging part was after cutting down the second cable we had no slack cable left making it really hard to handle getting it back wrapped around the eye hook through the ferrule.
The cut wire kept poking Brent in the hands and his arms got really tired as he tried to work with the cable above his head. But he was a trooper and made it happen.

9. Because we ended up only making four runs instead of five, we had excess string light. Brent was able to take the light on the end of the string, which caps the wires, and move it to the spot where we needed and then cut off the left over string lights.

There you have it, our canopy of string lights in our backyard! I can’t wait to continue to make this space dreamy by adding cozy seating, a large rustic table for gathering and lots of large planters filled with tall plants. Our backyard still has a ways to go until it is up to the Parenthood backyard standards but this is a great start and we are excited to tackle more projects for this space.